| |
Basic Interaction with ROS and TouchOSC
Description: Interacting with some of the capabilities of ROS and OSCTutorial Level: BEGINNER
Next Tutorial: Using the Default Handler
Contents
Running touchosc_bridge
The core of the ROS-TouchOSC functionality is contained in touchosc_bridge. To get started using it, let's write a simple launch file to start the layoutserver_node and touchosc_bridge.
This file is available in rososc_tutorials/03basicinteraction/basic_interaction.launch
<launch>
  <param name="layout_path" value="$(find rososc_tutorials)/layouts" />
  <rosparam param="layouts">
    [ "ROS-Demo-iPad.touchosc", "ROS-Demo-iPod.touchosc" ]
  </rosparam>
  <node pkg="touchosc_bridge" type="touchosc_bridge.py" name="touchosc"
        output="screen">
    <param name="osc_name" value="ROS OSC Default" />
    <param name="port" value="9000"/>
    <param name="print_fallback" value="True" />
    <param name="load_default" value="True" />
    <param name="publish_accel" value="True" />
    <param name="publish_diag" value="True" />
    <param name="vibrate" value="True" />
    <param name="tabpage_sub" value="True" />
  </node>

  <node pkg="pytouchosc" type="layoutserver_node" name="layoutserver"/>
</launch>
Explanation of Parameters
The parameters included in the above file are straightforward for the most part. In-depth documentation is available in the touchosc_bridge package documentation. Below, each parameter is briefly outlined.
layout_path - Path to the layout files to be loaded.
layout_files - Layout files to be used with touchosc_bridge and layoutserver_node
osc_name - The name that will appear in the browse list on iOS devices
port - The port that the OSC server will listen on.
print_fallback - Print unhandled messages to the console.
load_default - Use the default handler on any tabpages not otherwise matched.
publish_accel - Publish iOS device accelerometer data
publish_diag - Publish diagnostics messages from the touchosc_bridge
vibrate - Enable the vibrate subscriber.
tabpage_sub - Enable the tabpage switch subscriber.
Starting touchosc_bridge
Now that we have seen an example layout file, let's start the touchosc_bridge.
roslaunch rososc_tutorials basic_interaction.launch
Connecting your iOS Device
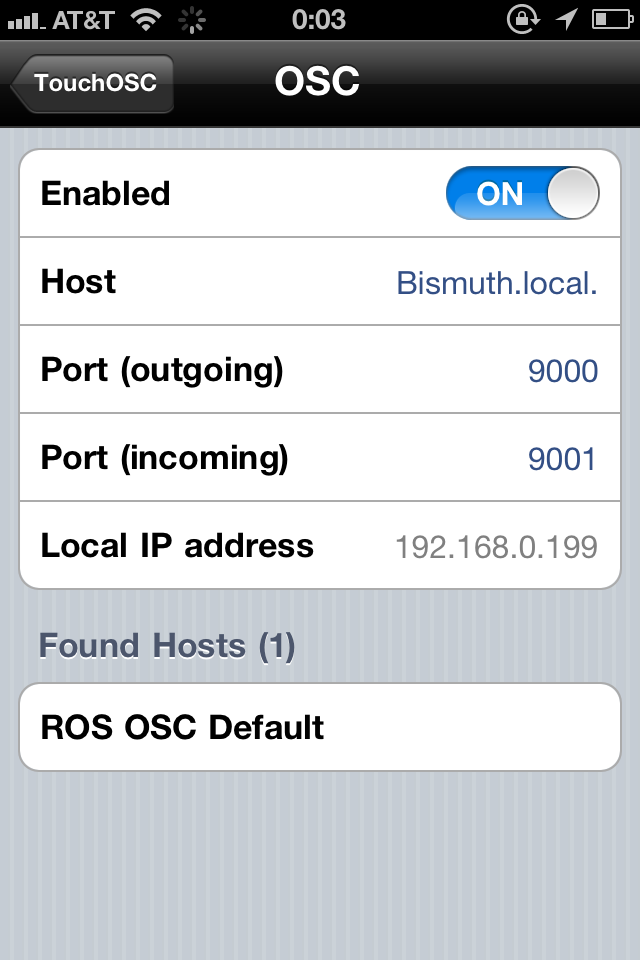
Now that the touchosc_bridge is started, open the TouchOSC application on your iOS device. Open the settings menu (if it is not already open), by clicking the "i" icon in the upper-right corner of the screen.
Under the Connections heading, click on the OSC menu item. Here, you will see a list of settings for connecting to an active OSC server. In the Found Hosts list, you should see the name of the server as you specified in the launch file above. Clicking on the host will automatically populate the relevant connection fields.

Accelerometer
TouchOSC will publish the accelerometer data from iOS devices, if the option is enabled.
To enable the accelerometer, open the settings menu in the TouchOSC application. Under the Options sub-menu, turn the Accelerometer option on.
If the accelerometer is enabled on the device as well as the ROS parameter, then data will be published on the <nodename>/accel topic with the sensor_msgs/Imu message. The msg.header.frame_id will be populated with the IP address of the sending client.
The accelerometer data publishes at approximately 30 Hz. Use the following to verify:
rostopic hz /touchosc/accel
The output should look like:
subscribed to [/touchosc/accel]
average rate: 29.475
        min: 0.020s max: 0.105s std dev: 0.01416s window: 29
average rate: 30.734
        min: 0.020s max: 0.105s std dev: 0.00993s window: 61
The rxplot tool may also be used to plot the output of the accelerometer data.
rxplot /touchosc/accel/linear_accleration/{x,y,z}
Vibration
On the iPhone, a vibration message is supported. When a std_msgs/Empty message is sent to the <nodename>/vibrate topic, then the iPhone will vibrate for approximately half a second.
To test the vibration, assuming that you have an iPhone and the accel parameter enabled, use the rostopic command.
rostopic pub /touchosc/vibrate std_msgs/Empty
The phone should buzz. To send at a higher rate, use the -r switch
rostopic pub -r 5 /touchosc/vibrate std_msgs/Empty
Programmatically Switching Tabpages
Another standard feature of touchosc_bridge is that it provides a ROS topic at <nodename>/tabpage that publishes when a client changes it's tabpage.
It also subscribes to the same topic, and will send an OSC message to change a tabpage on a client when it receives a message.
Programmatically switching tabpages can be disabled via the tabpage_sub parameter, but the node will always publish tabpage changes. The publisher and subscriber are contained on the same topic and use the touchosc_msgs/Tabpage message
Listening to Tabpage Changes
To test this, echo the tabpage topic to the command line, and try changing tabpages on your client:
rostopic echo /touchosc/tabpage
You should see something like the following:
header:
  seq: 3
  stamp:
    secs: 1320557712
    nsecs: 950566053
  frame_id: 192.168.0.198
tabpage: TextDemo
---
header:
  seq: 4
  stamp:
    secs: 1320557713
    nsecs: 703830003
  frame_id: 192.168.0.198
tabpage: 1
Each message corresponds to a client changing tabpages.
Publishing Tabpage Changes
You can also publish to the same topic to "force" a client to change tab pages, possibly to bring something to the user's attention.
To test this, publish a message using the rostopic pub command.
rostopic pub /touchosc/tabpage touchosc_msgs/Tabpage '{tabpage: 'TextDemo'}'Provided your client was not already on the tabpage, it should have switched to the name you gave.
Additionally, you have the ability to make a single client change it's tabpage via the frame_id in the message header.
rostopic pub /touchosc/tabpage touchosc_msgs/Tabpage '{header: {frame_id: '192.168.0.10'}, tabpage: 'TextDemo'}'With multiple devices connected, only the specified device will change.
Diagnostics
By default, the touchosc_bridge publishes useful diagnostics on the /diagnostics topic.
There are two top-level diagnostic_msgs/DiagnosticStatus messages published by the nodes, as well as a message for each tabpage handler loaded (more on this later).
These can easily be viewed using the runtime_monitor package.
rosrun runtime_monitor monitor
The two main diagnostics messages that are published are as follows.
Touchosc_bridge status

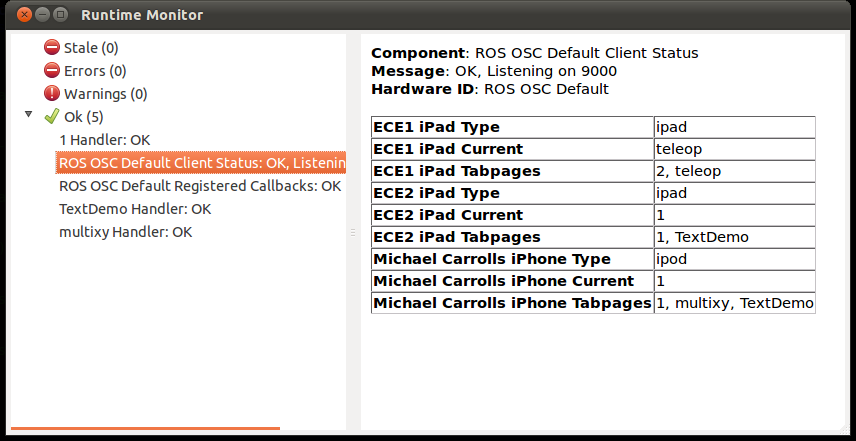
This message shows the activity status of all of the clients on the network. As can be seen in the screenshot, three clients are available on the TouchOSC node.
The node attempts to guess the device type (useful later on when writing multi-device layouts) from the name (most people leave the default name). It also keeps track of all of the tabpages "seen" on each device, as this is not a priori knowledge in some cases. Finally, it shows the active tabpage for each device.
Registered Callbacks

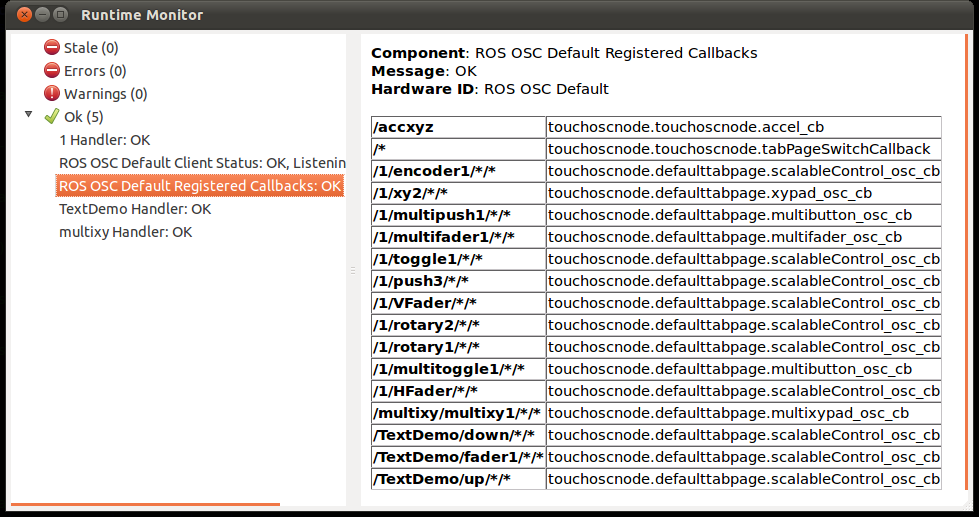
This message shows the callbacks for OSC messages as they have been registered on the touchosc_bridge. While this is not immediately useful now, it becomes convenient for troubleshooting callbacks when writing your own handlers later.
Tabpage Diagnostics Status
Additionally, each tabpage handler can provide it's own diagnostic status to be published. Within this example, each tabpage handler just publishes a list of clients that are known active (viewing).
Now that you have become familiar with some of the common functionality, it is time to move on to Using the Default Tabpage Handler


